GlydeBorealis (talk | contribs) (added detail to barbed wire) |
Strelock-gpuser (talk | contribs) m (Update info card to 1.0.4.4 game version) |
||
| (8 intermediate revisions by 4 users not shown) | |||
| Line 1: | Line 1: | ||
| − | {{stub}} |
||
| − | {{TnT Unit |
+ | {{TnT Unit v2 |
| − | | |
+ | | uid = barbedwire |
| ⚫ | |||
| − | | desc = Legend has it that the first shipment of barbed wire was mislabeled, "Feathers" by an overworked Operator. The name stuck ever since. |
||
| pic = barbedwire.png |
| pic = barbedwire.png |
||
| ⚫ | |||
| − | | attack = 2 Damage |
||
| cd = 1 |
| cd = 1 |
||
| − | | |
+ | | supply = 0 |
| ⚫ | |||
| − | | bt = 10 |
||
| − | | range = 1 |
||
| − | | traits = {{tooltip|Barbed Wire|Slows movement by 50%. Deals damage to enemies around it. Cannot be targeted by ranged units or toads.}} |
||
| ⚫ | |||
}} |
}} |
||
== Description == |
== Description == |
||
| + | The Feather Wires, or more simply called "barbed wires", are ground structures that slow any unit that touch the barbed wires (friendly units including). Enemy units that touch the barbed wire constantly take 2 damage a second as long as they remain touching them and are slowed by 50% (does not stack). Barbed wire cannot be destroyed by ranged units and requires the help from a melee unit (other than toads) to dismantle. |
||
| − | Barbed Wire's primary use is to slow down and advancing army. It takes ten seconds to build, so some forethought is required as to when and where an enemy army will come from. As it cannot be targeted by ranged unit, the only way to remove barbed wire from play is to walk up close to it, giving it some potential as a trap when combined with other units. |
||
| − | + | == Strategy == |
|
| + | Well-placed barbed wires can deter most form of aggression, particularly if said aggression is composed primarily of ranged units. Place them packed tight or loosely, depending on what you want to achieve. |
||
| − | ''Barbed wires are great against any ground unit, if you park them around your base, and a great deterrent against ranged units. Melee units are the only ones that can kill barbed wires so they either have to take some damage walking through it or take more damage trying to take it down.'' |
||
| + | === Playing with Barbed Wire === |
||
| ⚫ | |||
| + | Place barbed wires in choke points, entrances to your bases, backdoors, or on the side from which your opponent is mostly likely to attack from. Enemies moving through them suffer 2 dps per barbed wire they are touching, and have their movement speed cut in half, (e.g. if you're standing near 3 barbed wire, you'll constantly take 6 dps). You can place your barbed wires in 3 ways: right next to each other, with one space apart, or 2 spaces apart. Barbed wire damage does stack so tightly packing them can be more effective in fending off enemies but will cost more food, while leaving two tiles in between each barbed wire will lessen the cost but will be easier to destroy and breach, so choose wisely. When you're on the defense, fight from behind your barbed wire, and shoot down enemy melee units to prevent their ranged units from proceeding any further. |
||
| − | * Barbed wire can be used as a method of monitoring a choke point. Regularly checking whether barbed wire has been destroyed in a choke point can give an indication of whether an enemy army has passed that way. |
||
| − | * When you build them, put one tile space in between them for maximum coverage. |
||
| + | === Playing against Barbed Wire === |
||
| + | If you can, try to avoid taking damage from barbed wire. If there's a way around to their base without barbed wires, take it. If you need to take it out, hope that you brought some melee units with you. Lizards are ideal for taking out barbed wires because they can take out barbed wire from an extended range without taking damage. However, be sure to only take a few [[Lizard|lizards]] at a time, otherwise they'll all want to target it and inadvertently get too close to it or run into other barbed wires. [[Mole|Moles]], [[Chameleon|chameleons]], and the zombie mice from the [[owl]] are the only other units that can attack the barbed wire, so hope that you brought at least one of them. Alternatively, you can rally your [[Falcon|falcons]] to just fly right over the wires without any problem. If you're forced to march through the wires, having [[Pigeon|pigeons]] can medicate some of the damage by the crossing. |
||
| + | |||
| ⚫ | |||
| + | <gallery> |
||
| + | file:wire1_build.gif |
||
| + | file:wire1_attack.gif |
||
| + | file:wire2_build.gif |
||
| + | file:wire2_attack.gif |
||
| + | file:wire3_build.gif |
||
| + | file:wire3_attack.gif |
||
| + | </gallery> |
||
| + | |||
| + | == Changelog == |
||
| + | * '''Release 1.0.3:''' |
||
| + | ** Health now 25 (was 20) |
||
{{Unitnav}} |
{{Unitnav}} |
||
Latest revision as of 01:35, 24 October 2017
Description[ | ]
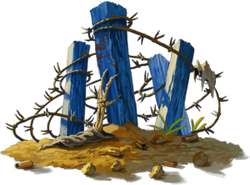
The Feather Wires, or more simply called "barbed wires", are ground structures that slow any unit that touch the barbed wires (friendly units including). Enemy units that touch the barbed wire constantly take 2 damage a second as long as they remain touching them and are slowed by 50% (does not stack). Barbed wire cannot be destroyed by ranged units and requires the help from a melee unit (other than toads) to dismantle.
Strategy[ | ]
Well-placed barbed wires can deter most form of aggression, particularly if said aggression is composed primarily of ranged units. Place them packed tight or loosely, depending on what you want to achieve.
Playing with Barbed Wire[ | ]
Place barbed wires in choke points, entrances to your bases, backdoors, or on the side from which your opponent is mostly likely to attack from. Enemies moving through them suffer 2 dps per barbed wire they are touching, and have their movement speed cut in half, (e.g. if you're standing near 3 barbed wire, you'll constantly take 6 dps). You can place your barbed wires in 3 ways: right next to each other, with one space apart, or 2 spaces apart. Barbed wire damage does stack so tightly packing them can be more effective in fending off enemies but will cost more food, while leaving two tiles in between each barbed wire will lessen the cost but will be easier to destroy and breach, so choose wisely. When you're on the defense, fight from behind your barbed wire, and shoot down enemy melee units to prevent their ranged units from proceeding any further.
Playing against Barbed Wire[ | ]
If you can, try to avoid taking damage from barbed wire. If there's a way around to their base without barbed wires, take it. If you need to take it out, hope that you brought some melee units with you. Lizards are ideal for taking out barbed wires because they can take out barbed wire from an extended range without taking damage. However, be sure to only take a few lizards at a time, otherwise they'll all want to target it and inadvertently get too close to it or run into other barbed wires. Moles, chameleons, and the zombie mice from the owl are the only other units that can attack the barbed wire, so hope that you brought at least one of them. Alternatively, you can rally your falcons to just fly right over the wires without any problem. If you're forced to march through the wires, having pigeons can medicate some of the damage by the crossing.
Gallery[ | ]
Changelog[ | ]
- Release 1.0.3:
- Health now 25 (was 20)
Units
| ||
| Tier 1 | Squirrel • Lizard • Toad • Pigeon • Mole | |
|---|---|---|
| Tier 2 | Ferret • Chameleon • Falcon • Skunk • Snake | |
| Tier 3 | Badger • Boar • Fox • Owl • Wolf | |
| Structures | Barbed Wire • Land Mine • Balloon • Turret • Artillery | |


