GlydeBorealis (talk | contribs) (added detail to mines) |
GlydeBorealis (talk | contribs) mNo edit summary |
||
| Line 3: | Line 3: | ||
{{TnT Unit |
{{TnT Unit |
||
| name = Tremormine |
| name = Tremormine |
||
| + | | struct = Land mine |
||
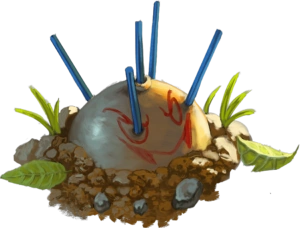
| desc = The portraits on top of Tremormines memorialize fallen Operators. No Operator goes down without a fight, and none rests without revenge. |
| desc = The portraits on top of Tremormines memorialize fallen Operators. No Operator goes down without a fight, and none rests without revenge. |
||
| pic = landmine.png |
| pic = landmine.png |
||
Revision as of 22:18, 18 October 2016
| This article is a stub. You can help Tooth and Tail Wiki by expanding it. |
| "Tremormine" | |
|---|---|
| |
| The portraits on top of Tremormines memorialize fallen Operators. No Operator goes down without a fight, and none rests without revenge. | |
| Details | |
Structure |
Land mine |
Defense |
5 HP |
Attack |
20 Damage (primary) / 5 Damage(secondary) |
Range |
1 Tiles |
Unit Cost |
20 Food |
Build Time |
10 Seconds |
Trait(s) |
Landmine |
Strategy |
Place landmines in places you think they'll walk to devastate their army before the fight even begins. |
Description
The Tremormine takes ten seconds to build, so some forethought is required when placing them. Good placement is essential when using Tremormines, as they are only useful if an enemy steps directly on the them. Because of this, building them in chokepoints is highly recommended.
Bookbot's Description
Mines are most useful in chokepoint or anywhere you're sure the enemy will walk through to get to your base. A few well placed mine can take out a small army of toads, lizards, or squirrels. Just keep in mind they can't be built on slopes, farmland, in water, or on bridged, but otherwise can be built anywhere on the map.
Strategy
- Build Mines predominantly in choke point, or other areas where the enemy is likely to traverse.
Units
| ||
| Tier 1 | Squirrel • Lizard • Toad • Pigeon • Mole | |
|---|---|---|
| Tier 2 | Ferret • Chameleon • Falcon • Skunk • Snake | |
| Tier 3 | Badger • Boar • Fox • Owl • Wolf | |
| Structures | Barbed Wire • Land Mine • Balloon • Turret • Artillery | |